

How to Git ?
Because Bioinformaticians Too Don't Need 'Ctrl+Z' 999... Times!


Introduction
Have you ever caught yourself repeatedly saving copies of your scripts, and research paper drafts, or losing a vital dependency script in a chaotic tangle of files you created ages ago? No need to answer these questions; there is a solution!
It's called Git, a version control tool that will liberate you from the tedious practice of naming scripts like "final_script" "final_last_script" and "really_final_script".
Git has been around for quite some time and has been thoroughly tested, proving its reliability and robustness in the field. Git isn't just about lines of code; it's about taking control of your development process and embarking on a stress-free coding adventure. So, fasten your seatbelts and get ready to explore the time-tested magic of Git.
What is version Control?
Version control refers to the systematic management and tracking of changes made to software, scripts, and documents throughout the research and analysis process. Version control is like a magic time machine for your files and projects. It helps you save and track different versions of your work, so you can easily go back in time to see how things used to be or fix mistakes. It's like having a rewind button for your documents, code, or any files, and it's super useful for teamwork because everyone can work on the same project without stepping on each other's toes or losing the history of changes.
So, version control keeps your work organized, and safe, and helps you collaborate with others smoothly.
What is Git?
Common version control systems used in Bioinformatics include Git, Mercurial, and Subversion. Git, in particular, is widely used due to its flexibility, speed, and strong branching and merging capabilities. Bioinformatics researchers use version control not only for code but also for managing data, documentation, and research protocols, ensuring that their work remains organized, transparent, and reproducible throughout the research lifecycle.
Git was created by Linus Torvalds, the founder of the Linux operating system, and was first released in April 2005. It was developed to address the specific version control needs of the Linux kernel development community.
Under the hood, Git operates by tracking changes in a series of snapshots or commits. Here's a simplified overview of how it works:
Repository: Git repositories are directories that contain all the files and folders you want to track. These repositories can be local or hosted on remote servers.
Commits: Git records changes as commits. Each commit is a snapshot of the entire repository at a particular point in time. Commits include metadata like the author's name, email, and a commit message to describe the changes made.
Differences: Git calculates the differences between commits. These differences, also known as "deltas," are efficiently stored as changes between snapshots, reducing redundancy.
Branches: Git allows for the creation of multiple branches, which are essentially independent lines of development. Each branch has its own commit history and changes.
Merging: Git enables the merging of branches, combining changes from one branch into another. It automatically resolves conflicts when possible but may require manual intervention when conflicts occur.
Remote Repositories: Git can synchronize repositories across different locations. This enables collaboration among multiple developers, with one central repository serving as the reference point for all team members.
Distributed Nature: Git is a distributed version control system, meaning every copy of a Git repository is a full-fledged repository with its history and commits. This decentralization makes it resilient and suitable for collaboration among geographically dispersed teams.
Git's distributed nature, speed, and emphasis on data integrity have made it one of the most widely used version control systems in software development. It has since found applications in various domains beyond just code, including content management, data science, and Bioinformatics.
Are Git and GitHub The Same?
Git and GitHub are related but serve different purposes:
Git is a version control system that helps you manage changes to your code or files. It keeps a record of all the changes you make, allowing you to track, undo, and collaborate on your projects efficiently. Git is a tool you use on your computer.
GitHub, on the other hand, is a web-based platform built around Git. It provides a place to store and share your Git repositories in a central, online location. GitHub makes it easy to collaborate with others, manage issues, and access various tools for software development, all using a web interface. It's like a social network for code, where multiple people can work on projects together and contribute to open-source software. GitHub is a platform where you store and share your Git repositories.
Git In Action - Basics
Okay enough words in the air, time to Git going!
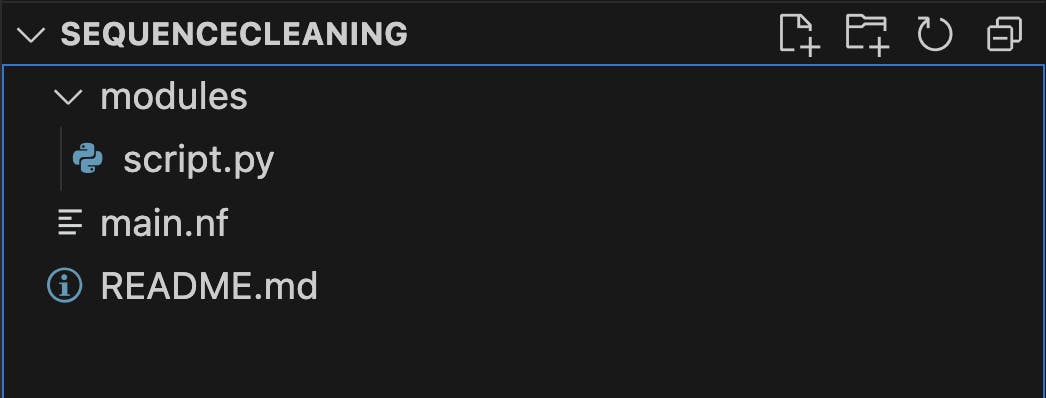
Let's start with an example, assuming we have a project named SequenceCleaning, with the following folder structure:
Step 1: Initialize a new Git repository in the current directory.
Command:
git init
Output:
$ git init

Initialized empty Git repository in /Users/user/Desktop/git/SequenceCleaning/.git/
Step 2: View the status of the working directory, showing untracked, modified, and staged files.
Command:
git status
Output:
$ git status

On branch main
No commits yet
Untracked files:
  (use "git add <file>..." to include in what will be committed)
        README.md
        main.nf
        modules/
nothing added to commit but untracked files present (use "git add" to track)
As you can see we are on the main branch, and none of the files are being tracked (staged).
Git also provides the next commands in the last line, which is really helpful in case you forget the syntax.
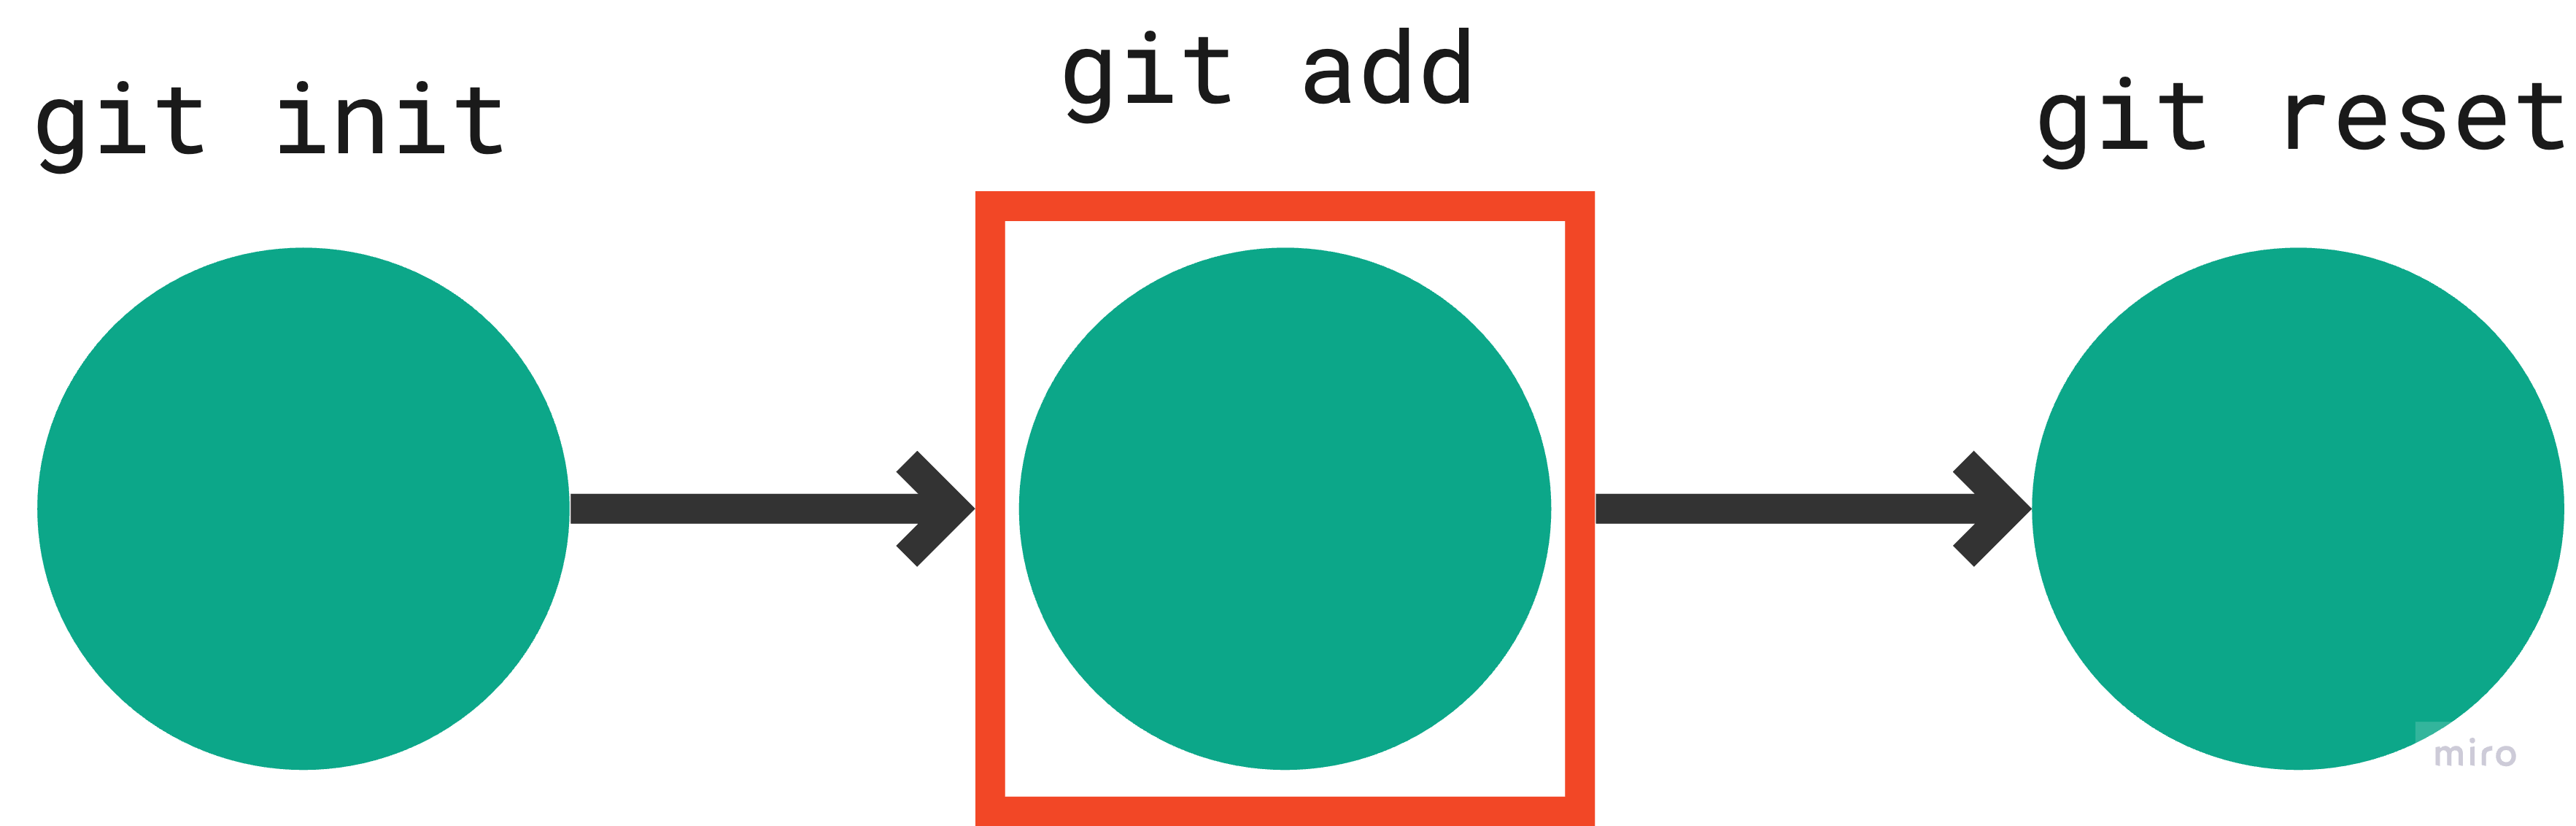
Step 3: Stage changes for commit.
Command:
git add <filename>
use . to include all files in the directory.
Representation:

Output:
$ git add README.md

On branch main
No commits yet
Changes to be committed:
  (use "git rm --cached <file>..." to unstage)
        new file:   README.md
Untracked files:
  (use "git add <file>..." to include in what will be committed)
        main.nf
        modules/
The README.md file was staged, using git add command.
Step 4: Unstage changes for the specified file.
Command: git reset <filename>
Representation:
Output:
$ git reset README.md

On branch main
No commits yet
Untracked files:
  (use "git add <file>..." to include in what will be committed)
        README.md
        main.nf
        modules/
nothing added to commit but untracked files present (use "git add" to track)
the reset command unstaged or in simpler terms stopped tracking the README.md file.
Step 5: Record the staged changes in a commit.
Command: git commit -m '<commit message>'
Representation:
Output:
$ git add README.md
$ git commit -m 'initial commit, added README.md'

[main (root-commit) 04e2204] initial commit, added README.md
 1 file changed, 0 insertions(+), 0 deletions(-)
 create mode 100644 README.md
Step 6: View logs of all commits in the current branch.
Command:
git log
Output:
$ git log

commit 04e22043e2f5696a6cd04c1a33375965bd11da06 (HEAD -> main)
Author: CodeBeast <CodeBeast@email.com>
Date:   Sat Nov 4 23:07:04 2023 +0530

    initial commit, added README.md
Each commit saves a snapshot of the current state of the repository, which can be accessed using the commit id mentioned in the first line.
Step 7: List all branches in the repository and highlight the current branch.
Command: git branch
Output:
$ git branch

* main
As of now, we have just one main branch.
Step 8: Switch to or create a different branch.
Command:
To create a branch add -b prefix to the branch name
git checkout -b <branch>
To switch branches just use
git checkout <branch>
Representation:
Output:
$ git checkout -b dev

Switched to a new branch 'dev'

$ git checkout dev

Already on 'dev'
By default, when using git checkout -b, Git creates a new branch if it doesn't already exist and immediately switches to that newly created branch. This is why you see the 'already on dev' message in this cases.
Step 9: Combine changes from the specified branch into the current branch.
Command: git merge <branch>
Representation:

Output:
# add `Hello World` in README.md file before running the following

$ git add README.md && \
  git commit -m 'Updated README.md'

[dev ec0f8ea] Updated README.md
 1 file changed, 1 insertion(+)

$ git checkout main

Switched to branch 'main'

$ git merge dev

Updating 04e2204..ec0f8ea
Fast-forward
 README.md | 1 +
 1 file changed, 1 insertion(+)
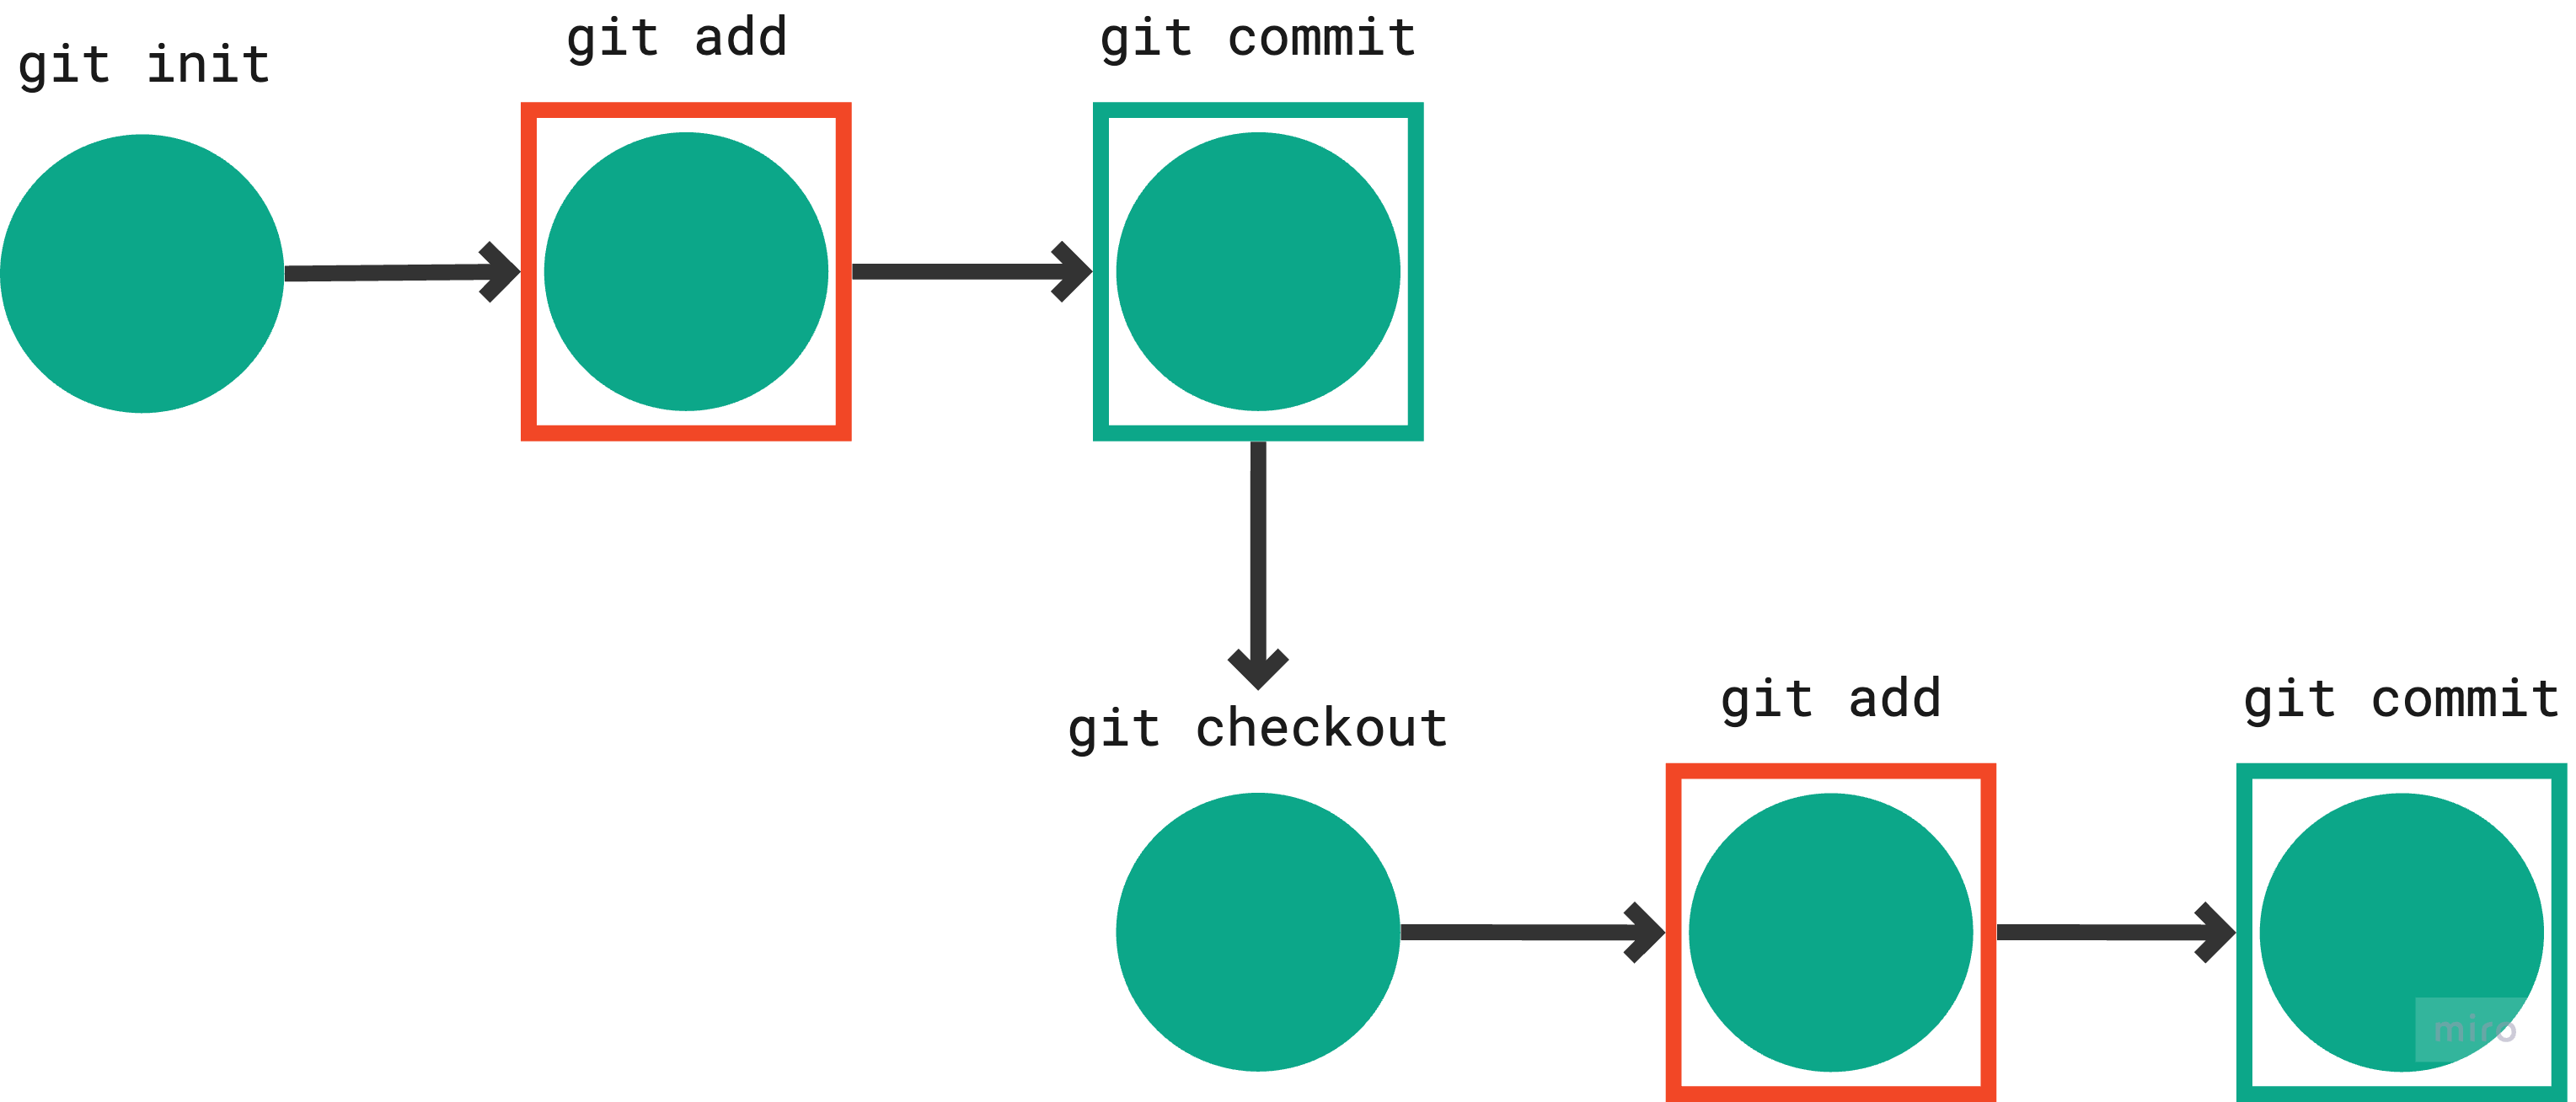
There is a lot to unpack here, let's do this one command at a time, first we repeated the previous commands whilst in dev branch to add and commit changes, followed by git checkout main to switch to main branch and finally git merge dev to merge changes made in README.md file present in dev branch into the main branch.
Assuming that the main branch serves as your production branch, housing stable and fully operational pipelines and scripts, we can then return to the dev branch for testing and script fixes. Once satisfied, commit these changes and merge them into the main branch. This workflow ensures that your deployed or working scripts remain intact while you introduce new features, preventing any unexpected hiccups in your production environment.
Step 10: View the differences between the working directory and the last commit.
Command:
git diff <commit ID 1> <commit ID 2>
Output:
$ git log

commit ec0f8eaf60a3755b0f41c294c58cea4bd35d037b (HEAD -> main, dev)
Author: CodeBeast <CodeBeast@email.com>
Date:   Sat Nov 4 23:18:00 2023 +0530

    Updated README.md

commit 04e22043e2f5696a6cd04c1a33375965bd11da06
Author: CodeBeast <CodeBeast@email.com>
Date:   Sat Nov 4 23:07:04 2023 +0530

    initial commit, added README.md

$ git diff ec0f8eaf60a 04e22043e

diff --git a/README.md b/README.md
index c57eff5..e69de29 100644
--- a/README.md
+++ b/README.md
@@ -1 +0,0 @@
-Hello World!
\ No newline at end of file
Running git log fetches the commit ID of the changes, and we can run git diff for the commits that we want to check, as can be seen from the output; we had added 'Hello World!' string to the README.md file, which is the difference between our first commit and the commit from the merged branch.
Step 11: Temporarily save changes not ready for commit, and switch branches or perform other tasks.
Command:
To stash changes
git stash
To recover stashed data
git stash pop
Output:
# Add new line `Hello Git!` in README.md file before proceeding
$ git stash

Saved working directory and index state WIP on main: ec0f8ea Updated README.md

$ git stash pop

On branch main
Changes not staged for commit:
  (use "git add <file>..." to update what will be committed)
  (use "git restore <file>..." to discard changes in working directory)
        modified:   README.md
Untracked files:
  (use "git add <file>..." to include in what will be committed)
        main.nf
        modules/
no changes added to commit (use "git add" and/or "git commit -a")
Dropped refs/stash@{0} (227f7f9dae24ad834b79896ce9e66c3aa4edf6cb)
When you find yourself uncertain about the changes you've made but need to switch branches in Git, you'll usually be required to commit your changes before doing so. However, there's a practical solution for this situation known as git stash. It allows you to temporarily save your current work without the need to commit it.
Once you're ready to switch branches, you can use git stash pop to retrieve your saved changes and continue where you left off, providing a convenient way to manage your work in progress without committing half-finished work.
Step 12: Time travel! I mean reverting the changes to a previous commit!
Command:
git checkout <commit ID>
Output:
$ git add README.md && \
  git commit -m 'updated README.md again' && \
  git log

commit ec0f8eaf60a3755b0f41c294c58cea4bd35d037b (HEAD -> main, dev)
Author: CodeBeast <CodeBeast@email.com>
Date:   Sat Nov 4 23:18:00 2023 +0530

    Updated README.md

commit 04e22043e2f5696a6cd04c1a33375965bd11da06
Author: CodeBeast <CodeBeast@email.com>
Date:   Sat Nov 4 23:07:04 2023 +0530

    initial commit, added README.md

$ git checkout 04e22043

Note: switching to '04e22043'.
You are in 'detached HEAD' state. You can look around, make experimental
changes and commit them, and you can discard any commits you make in this
state without impacting any branches by switching back to a branch.
If you want to create a new branch to retain commits you create, you may
do so (now or later) by using -c with the switch command. Example:
  git switch -c <new-branch-name>
Or undo this operation with:
  git switch -
Turn off this advice by setting config variable advice.detachedHead to false
HEAD is now at 04e2204 initial commit, added README.md

$ git log

commit 04e22043e2f5696a6cd04c1a33375965bd11da06 (HEAD)
Author: CodeBeast <CodeBeast@email.com>
Date:   Sat Nov 4 23:07:04 2023 +0530

    initial commit, added README.md
To begin, we added and committed the alterations made to the README.md file. Afterward, we used git log to obtain the commit IDs. The magic happens when we employ git checkout with the commit ID of our first commit—this action effectively undoes all the changes, rendering the README.md file empty once more.
Now, envision a scenario where your script or pipeline was in a perfectly functioning state at commit 10, and then you introduced something in commit 100 that led to an unexpected error. To gracefully return to the dependable 10th commit, representing the working version of your script or pipeline, simply deploy the git checkout <commit ID> command with the corresponding commit ID.
It's like hitting the rewind button for your code.
GitHub - Basics
We'll use the SameSequence Cleaning project to show how to use GitHub. These commands will help us host our code on either public or private repositories, making collaboration, sharing, and access easy.
Step1: Create a new GitHub repository
The requirement is obviously to have a GitHub account first, please refer to this guide to create an account as well as a GitHub repository:
Followed by setting your name and email to identify your commits
commands:
git config --global user.name "Your Name"
git config --global user.email "yourmail@example.com"
Step 2: Linking local repository
If we did not have a local project with git initialised we could just clone the online repository.
Command:
git clone <repository url>
Since we already have a local repository, let's add it to the repository instead.
Command:
git remote add origin <repository_url>
Followed by pushing the local repository to the GitHub repository's main branch (usually main or master)
Command:
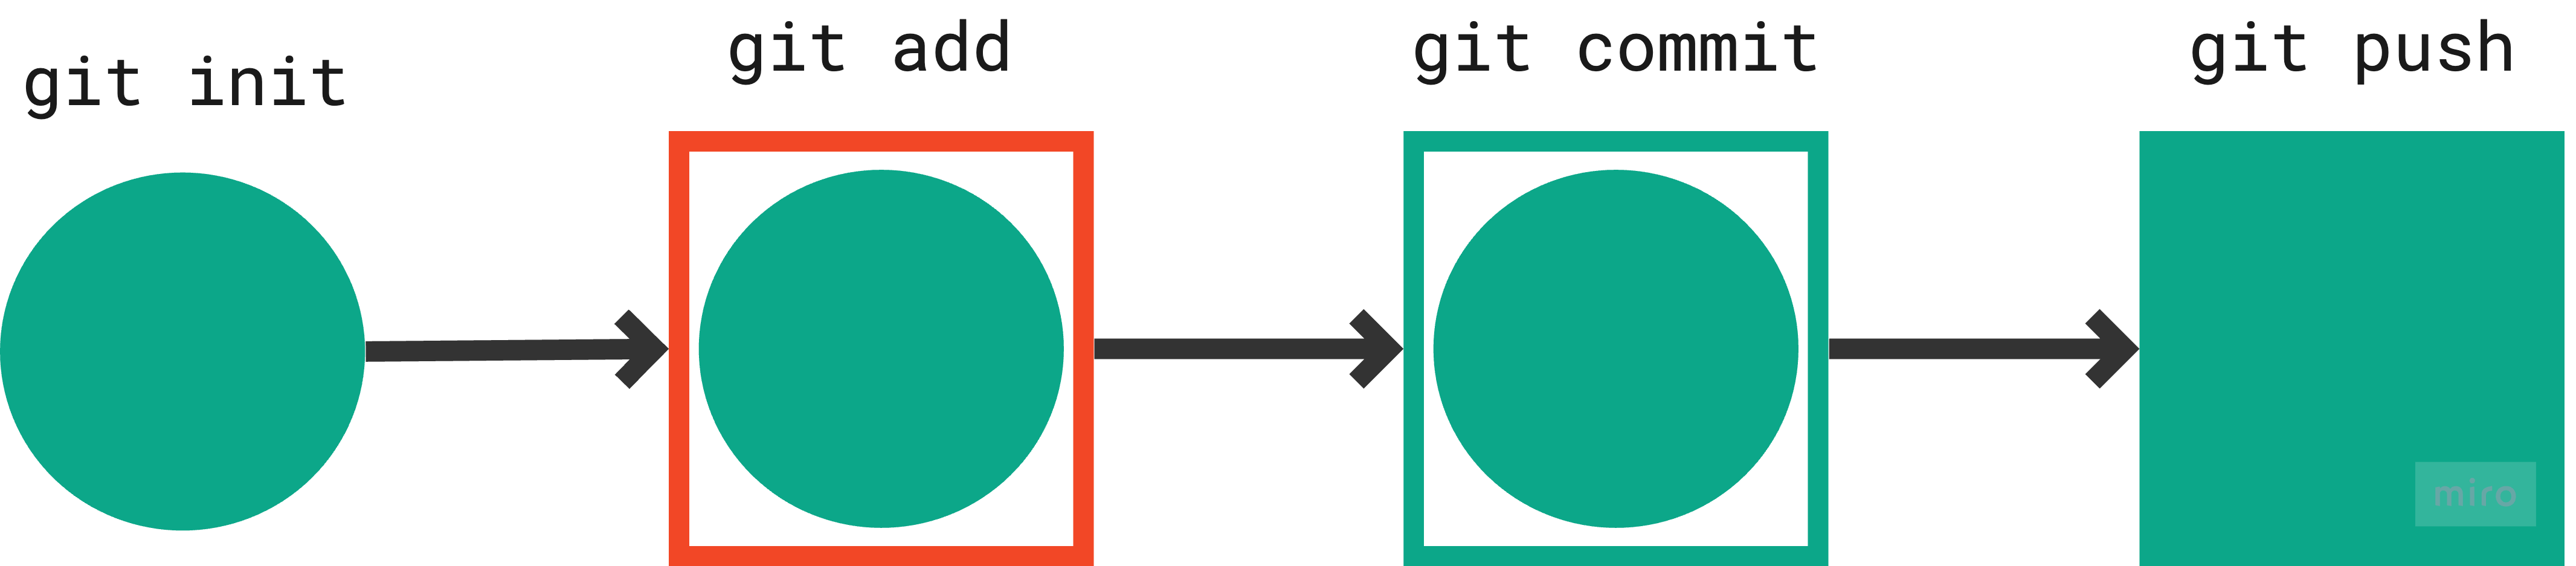
git push -u origin main
Now your local repository should be linked with the GitHub online repository.
Step 3: Repeat git-ing...
make changes to the files as you please and don't forget to stage and commit the changes!
Step 4: Push your local commits to a GitHub repository.
Command:
git push
Representation:
Step 5: Fetch and merge changes from the GitHub repository to your local repository.
Command:
git pull
Gitignore
.gitignore is a configuration file used in Git to specify which files and directories should be ignored and not tracked by Git.
These files are typically ones that you don't want to include in your version control system, such as log files, temporary files, build artefacts, or sensitive information like API keys and passwords.
The primary purpose of a .gitignore file is to prevent these files from cluttering your Git repository and from being accidentally committed to the version history. Ignoring such files is essential because it helps keep your repository clean, minimizes its size, and ensures that sensitive or irrelevant data is not shared with others.
Here's how you can create and use a .gitignore file:
Create a
.gitignorefile: You can create a.gitignorefile.Specify patterns: In the
.gitignorefile, you specify patterns for files and directories you want to ignore.You can use wildcards and regular expressions to match patterns. For example, to ignore all
.logfiles, you can add the following line to the.gitignorefile:*.log *.fastq.gz *.fa*Comments: You can include comments in the
.gitignorefile by starting a line with#. These comments help document why certain files or directories are being ignored.Directory-specific ignores: You can create a
.gitignorefile in the subdirectories of your repository to specify directory-specific rules. These rules will only apply to files within that directory.
Here's an example of a simple .gitignore file:
# Ignore log files
*.log

# Ignore temporary files and directories
.temp/
build/
__pycache__
After setting up your .gitignore file, Git will automatically exclude the specified files and directories when you run commands like git status or git add, preventing them from being accidentally committed to your repository. It's essential to keep your .gitignore file up-to-date as your project evolves to ensure that you're not tracking unnecessary or sensitive data.
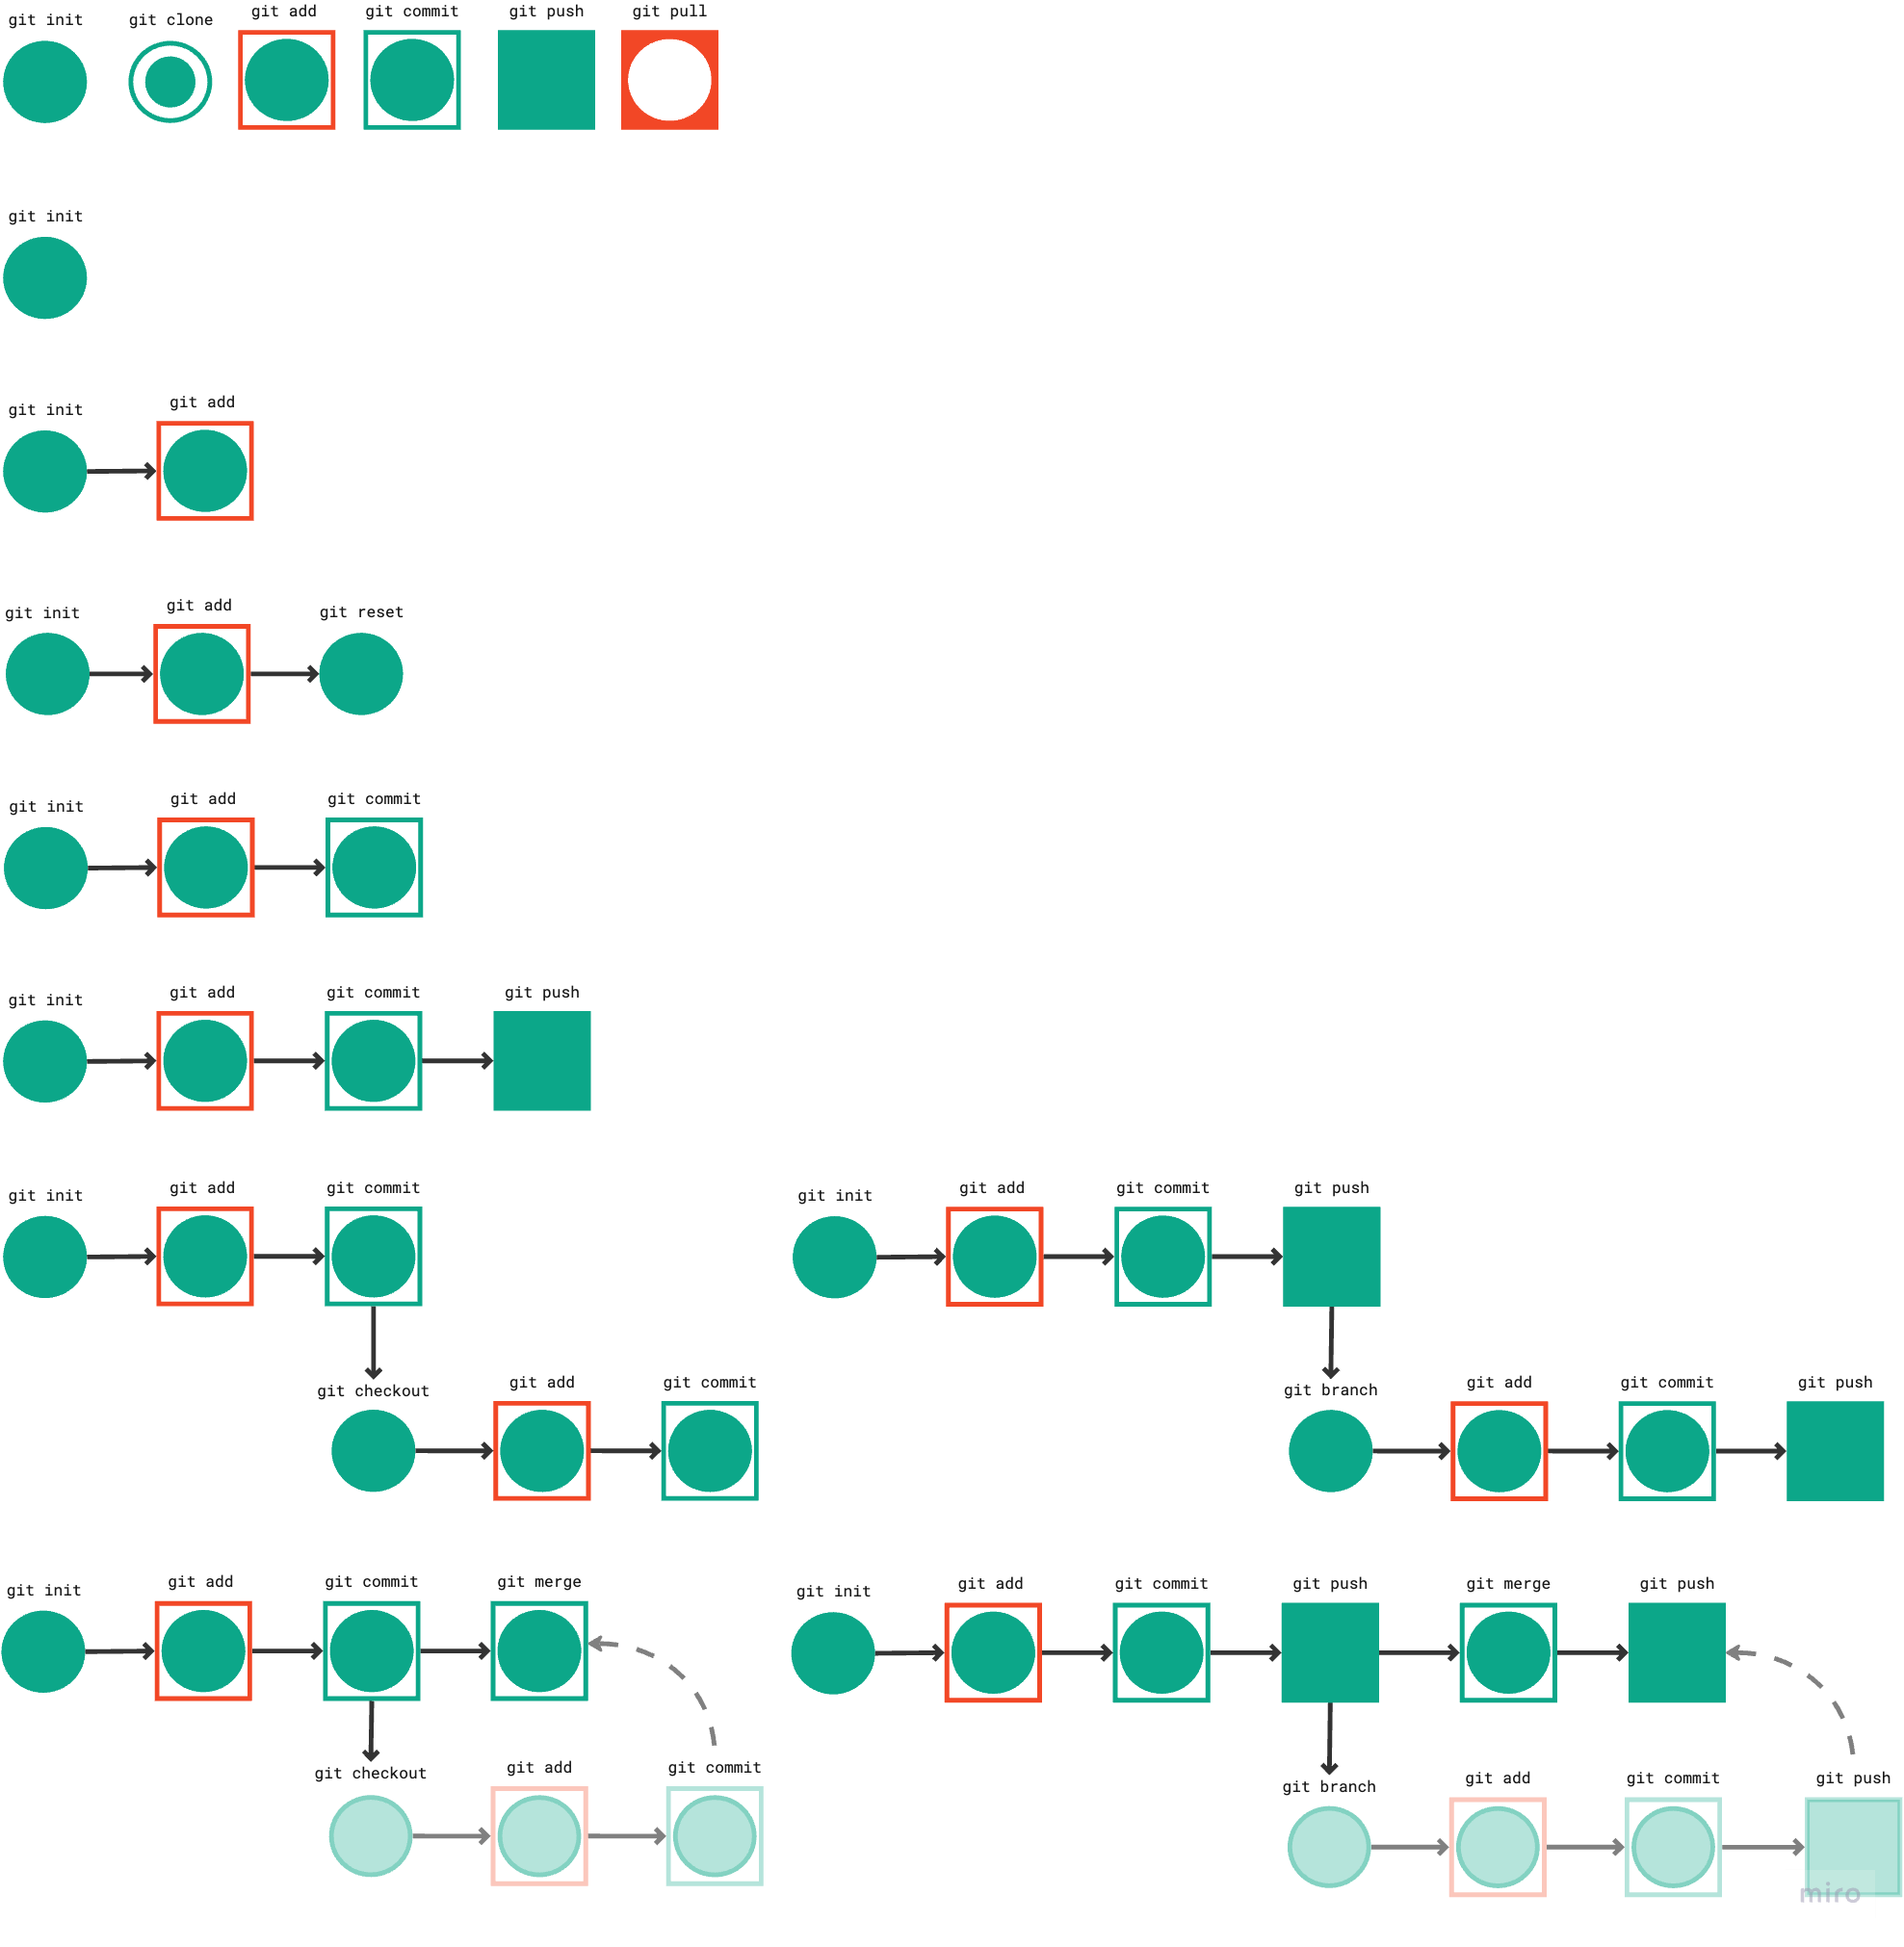
The figures were created using miro following is the complete flow:
While seemingly straightforward, Git packs a punch. If you haven't embraced its power yet, now's your chance.
Feel free to drop a comment if you're up for diving into the world of advanced Git commands, especially the art of conflict resolution and maintaining pristine commits.
Thanks for being an awesome reader!